
Create a Plan
Use the Plan Creation wizard to set up your plan structure.
Access requirements
Permission with one of the following capability sets:
-
Planner
-
Plan Administrator
Reach out to your administrator for access.
Prerequisites
Here are some things you may want to do before you create a plan.
Set the plan consolidation currency
The main plan's consolidation currency is the common reporting currency across all plans. For example, the consolidation currency for your main plan is CAD and the consolidation currency for your subplan is USD. When comparing data between these two plans, the currency amounts of the subplan will be converted to CAD.
To set the plan consolidation currency:
- On the navigation bar, click your User icon
 > Preferences
  > Workforce Planning.
 - Select the consolidation currency in the Which currency should the plan values be stored in list.
Note:
- If there is no consolidation currency set, your display currency will be used for consolidation.
- If there is no display currency set, the display currency set by your admin will be used for consolidation.
- If there is no default display currency set by your admin, USD will be used for consolidation.
- Changing the consolidation currency will not affect existing plans.
Create a plan
To create a plan, do one of the following:
- In the upper-right corner of the Plans room, click the Create button
 > Plan.
 - Click the Create button on the right side of the My plans heading.
Result: The Plan Creation wizard opens.
Using the Plan Creation wizard
Go through the wizard and follow the instructions on each page. Use the following information as guidance to set up your plan project.
Select your plan model
Choose between the following models. Once the plan is created, you cannot change the plan model.
- Guided Diversity Planning
- Headcount Forecasting
- Headcount and Cost Planning (Classic)
-
Headcount and Cost Planning (New)
Note: For more information on which Headcount and Cost Planning model to select, see Headcount and Cost Planning Model.
-
Skills Planning
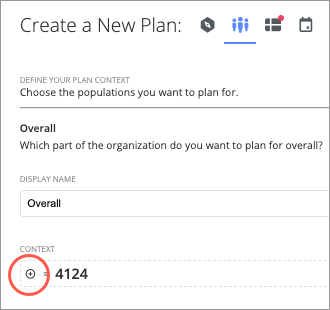
Define your plan context
Choose the populations you want to plan for. Once the plan is created, you cannot change the plan context.Apply filters to define the part of the organization you want to plan for by clicking the Add filter button ![]() on the left side of the overall population.
on the left side of the overall population.
Depending on the plan model that you've selected, you may need to set an overall population as well as a focus group when defining the plan context.
The overall population
Select the overall population you want to plan for. Unless you're creating a plan that involves the entire workforce, you should filter the plan context to a specific population. For example, if you're only interested in planning for the leadership roles in your organization, you can apply the filter Manager Status > Manager to refine the overall population.
The focus group
In some models, such as the Guided Diversity Model, you'll be asked to define a focus group as part of your plan context. The focus group is a distinct population within your overall population that you've identified as a group of interest. For example, if you're interested in understanding the representation of women within leadership, you would define your plan context for the Guided Diversity Model in the following way:
- Overall: Apply the filter Manager Status > Manager to refine the overall population to employees in leadership roles.
- Focus group: Apply the filter Gender > Woman to refine the focus group to women.
When working with this type of plan model, you'll be setting a goal for the focus group as a percentage of the overall population. Essentially, what proportion of the overall population will the focus group represent. Using the previous example, you may set a goal to increase women in leadership roles to 50%. If you look at it mathematically, the focus group is the numerator and the overall population is the denominator.
- We recommend that you enter display names for both the overall population and focus group.
- Descriptive names will help planners understand the population they're planning for especially when the population is defined by multiple filters.
- The name that you give to your focus group will automatically be inserted into the display name of the plan items.
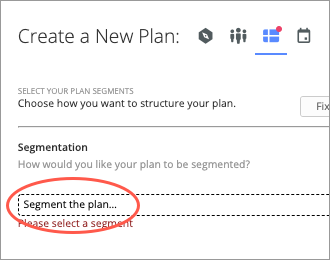
Select your plan segments
Define your plan structure. You must complete this step to create your plan.
Next, select the attributes to define your plan segmentation by clicking Segment the plan.
You can plan by division, location, cost center, job family, or more. For example, if you want to plan across countries, select the Location Hierarchy attribute and the corresponding level. The more levels and attributes you include in your plan structure, the more detailed your plan will be. For example, if you want to plan for cost centers within particular locations, you would segment your plan by Location Hierarchy and Cost Center Hierarchy. Choose the appropriate level of granularity to match your operational needs. We recommend that you segment your main plans at a high level and include more granularity in your subplans.
Note:
- The maximum number of levels you can include in your plan structure is 12.
Plans can have a maximum of 20,000 rows.
If an attribute has overlay data, the plan model will automatically pull and populate these pre-aggregated values that you've provided as limits or targets in the plan. However, when using the Headcount and Cost Planning model, you'll have to manually sync overlay data to limits. To sync your limits, click the Edit Configuration button
in the upper-left corner of the planning grid. Then select the metric (budgeted or forecast) that you want to sync your limits to in the Sync limits to published budgets configuration area.
If you're using the Headcount and Cost Planning model, you must also choose between a fixed or freeform plan structure. For more information, see About the plan structure.
- Freeform plans provide greater flexibility for subplanners allowing them to define their own segmentation for their subplans. However, the segments across the main plan and subplans cannot be combined to generate aggregated values for the main planner.
- Fixed plans allow the main planer to combine the segments across the subplans to generate aggregated values through Exploration Snapshots. However, subplanners can only work with the segments that the main planner has selected during plan creation.
Optional: Define your plan calculation level
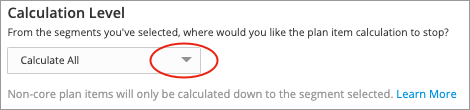
By default, the Headcount and Cost Planning (Classic) model distributes changes in plan values to all lower levels of the plan. Optionally, you can define your plan's calculation level after you have selected your plan segments. Select any plan segment as your calculation level so that changes in plan values for non-core plan items will only be distributed down to that segment. For more information about non-core plan items and calculation levels, see Calculation Levels for Plan Items.
- Click the Expand button
 on the right side of the Calculation Level area.
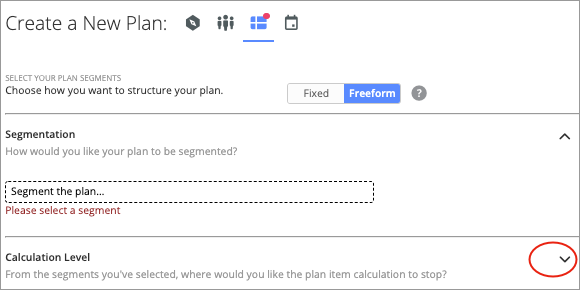
In the Calculation Level list, select the segment where you would like the plan calculation to stop.
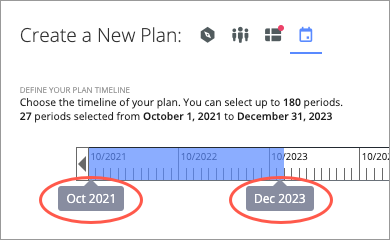
Define your plan timeline
Select the time range you want your plan to cover by moving the sliders to set the start and end date. You can select up to 180 periods.
The plan start date can be moved forward after the plan has been created by clicking the Edit Configuration button ![]() . Changing the plan start date may result in loss of data.
. Changing the plan start date may result in loss of data.
Additional plan configurations
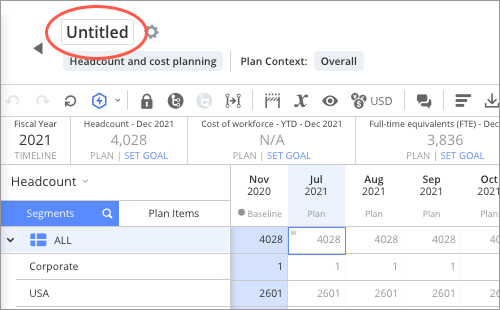
Name your plan
Give your plan a name. The plan name is included in search results and appended to plan metrics in the Explore room.
Enter a descriptive name for your plan in the Plan name box in the upper-left corner of the planning grid.
Attach assumption models
Create and apply assumptions to plan items, such as turnover rate and workforce costs, to fine tune how they will change over the course of your plan. For more information, see Assumption Models. Click the Assumption models button  on the toolbar to create and attach assumption models.
Sync limits to published budgets
If you're using the Headcount and Cost Planning (Classic) model and you have loaded budget data, you can sync the recommendations provided from the Finance team as limits in your plan. Planners will be warned if their plan values exceed the limits that have been set. For more information, see Limits and Targets.
To sync your limits, click the Edit Configuration button ![]() in the upper-left corner of the planning grid. Then select the metric (budgeted or forecast) that you want to sync your limits to in the Sync limits to published budgets configuration area.
in the upper-left corner of the planning grid. Then select the metric (budgeted or forecast) that you want to sync your limits to in the Sync limits to published budgets configuration area.
How the planning grid is populated
Based on the settings that you defined in the Plan Creation wizard, the planning grid is populated with projected values. The projected values are calculated using the data that is loaded for the baseline period (such as actual headcount and budgeted total cost of workforce) and any attached assumption models. For more information, see The Baseline Period.
Known limitations
To ensure that planning best practices and optimal performance are maintained, the following plan limits have been put in place:
Plans can have a maximum of 20,000 rows.
Attributes with more than 10,000 members cannot be added as a plan segment.
Assumption models can have a maximum of 20,000 rows.
Assumption models that contain plan segments that are not included in the plan cannot be attached.